Official Luthiers Forum!

Owned and operated by Lance Kragenbrink
It is currently Tue Jun 24, 2025 12:34 pm


All times are UTC - 5 hours


Post new topic Reply to topic  [ 44 posts ]  Go to page 1, 2  Next
Author Message
 Post subject:
PostPosted: Tue Apr 04, 2006 2:19 pm 
Offline
Brazilian Rosewood
Brazilian Rosewood

Joined: Sun Dec 25, 2005 6:32 am
Posts: 7774
Location: Canada
Hi folks, i guess s**t happens to most of us once in a while, tonight i encountered a deception, i dropped my template on my top that i had just sanded to 0.16", i thought i was gonna be sick and then i thought Bear, no, Serge, don't worry, it's all part of the learning CURVE, the folks at the OLF have probably all went through this, take pics, show them and you'll have abunch of uncles to your rescue!

When i told my wife what had happened, she thought of encouraging me right away and helped me find solutions and came up with inlaying this mistake, sounded good to me but i thought i'd let you pros and bros advise me on this one, the dent occured at the lower bout of the top, here are some pics to better explain this!TIA

Serge


And the guilty hand with the accomplice


Top
 Profile  
 
 Post subject:
PostPosted: Tue Apr 04, 2006 2:32 pm 
Offline
Koa
Koa
User avatar

Joined: Thu Feb 24, 2005 4:53 am
Posts: 1584
Location: PA, United States
A)flip it over and use the other side?

B) .160" is AWEFULLY thick. WHen you get down to .120 or so will it have disappeared?


Top
 Profile  
 
 Post subject:
PostPosted: Tue Apr 04, 2006 2:47 pm 
Offline
Contributing Member
Contributing Member

Joined: Mon Jan 03, 2005 7:46 am
Posts: 1315
Location: Branson, MO
First name: stan
Last Name: thomison
City: branson
State: mo
Zip/Postal Code: 65616
Country: united states
Focus: Build
Status: Professional
Terry is right at .160 is way thick enough to sand it out probably. I can't see dent enough to tell, but damp rag and iron and steam it out might be option as well turn it over. Lot of way to go


Top
 Profile  
 
 Post subject:
PostPosted: Tue Apr 04, 2006 2:50 pm 
Offline
Contributing Member
Contributing Member
User avatar

Joined: Thu Feb 09, 2006 2:35 pm
Posts: 2951
Location: United States
First name: Joe
Last Name: Beaver
City: Lake Forest
State: California
Focus: Build
I assume it is on the top surface of the plate? The one you already have the rosette in? If the rosette is not there than taking it down to .012 or so ought to do it.

If you can't do that then heat up a cloths iron to hot, wet a paper towel and lay it on the spot and put the hot iron on it. it should raise it out. A little sanding and scraping should take care of it from there. But I could be missing something.....

_________________
Joe Beaver
Maker of Sawdust


Top
 Profile  
 
 Post subject:
PostPosted: Tue Apr 04, 2006 2:52 pm 
Offline
Koa
Koa

Joined: Thu Feb 17, 2005 3:38 pm
Posts: 1542
Location: United States
    I think you will be fine. First I would steam the dent up then sand to final thickness. A top can finish out .100    
    Take a hot iron and a wet paper towel. You will be surprised at how much of the dent will dissapear . Lay the paper towel on the dent and iron it. Once the steam penetrates the wood cells it will swell them up and the dent will all be gone when you sand,
john hall


Top
 Profile  
 
 Post subject:
PostPosted: Tue Apr 04, 2006 3:32 pm 
Offline
Brazilian Rosewood
Brazilian Rosewood

Joined: Sun Dec 25, 2005 6:32 am
Posts: 7774
Location: Canada
Thanks guys, i'll probably try to steam the dent since it happened on the top surface of the plate with the rosette(thanks Joe), i even thought od collecting saw dust from that same top, when i'll be cutting the outer perimeter, mixing it's dust with some kind of glue that would help blend it in.

The idea of sanding it down to .120 sounds good also, since it happened at the end of the lower bout, do you think it would be a good idea to thin the outer edges only?


Top
 Profile  
 
 Post subject:
PostPosted: Tue Apr 04, 2006 5:47 pm 
Offline
Contributing Member
Contributing Member
User avatar

Joined: Tue Jan 04, 2005 10:03 am
Posts: 6680
Location: Abbotsford, BC Canada
Serge, don't even think about glue and sawdust on a soft wood, you'll never ever hide it that way, it will only make it stand out more.

As Stan, Joe and John have already mentioned, steam it out. Do you know how to do this?

Take the tip of a rag, roll it a little bit than dip it in some water, now take your wifes clothes iron (you decide if you should tell her or not 
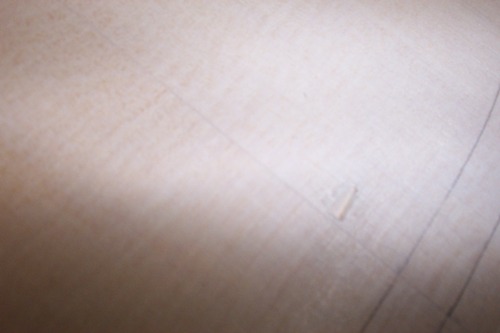
) and using just the tip, touch it to the rag, don't leave it there for long. Check your progress and remember to moisten (not soaking here) the rag from time to time, if the top is just dented and there are no grains cut from the drop, it should all steam out. Work it till you can't get it to come up any more, than sand the top down to the point where you don't see the dent anymore as long as it isn't less than 0.12". You should be fine here. Now if you can getaway with only sanding till the top is say 0.13 or 0.14" and the dent is gone, don't go any more on the show face, flip it over and sand from the inside (this way you won't be tempting fate and accidentally sand through that nice rosette of yours, it happens)

Just another bend in the learning curve there my friend. Don't sweat it, you'll get there. Rod True38812.1181481481

_________________
My Facebook Guitar Page

"There's really no wrong way, as long as the results are what's desired." Charles Fox

"We have to constantly remind ourselves what we're doing....No Luthier is putting a man on the moon!" Harry Fleishman

"Generosity is always different in the eye of the person who didn't receive anything, but who wanted some." Waddy Thomson


Top
 Profile  
 
 Post subject:
PostPosted: Tue Apr 04, 2006 10:21 pm 
Offline
Brazilian Rosewood
Brazilian Rosewood

Joined: Sun Dec 25, 2005 6:32 am
Posts: 7774
Location: Canada
Thanks Rod, ok got you all on the steam with moistened rag and clothes iron to steal from my wife, it does sound like a great idea, wish me luck!

Thanks again folks!


Top
 Profile  
 
 Post subject:
PostPosted: Tue Apr 04, 2006 10:28 pm 
Offline
Koa
Koa

Joined: Thu Nov 10, 2005 12:43 pm
Posts: 1031
Location: United States
Looks like you already got the correct advice. I use the water and hot iron method for ding removal a lot. I learned this back when i was building and repairing rifles.

Al


Top
 Profile  
 
 Post subject:
PostPosted: Tue Apr 04, 2006 10:42 pm 
Offline
Cocobolo
Cocobolo
User avatar

Joined: Wed Jan 18, 2006 4:04 am
Posts: 313
Location: United States
First name: Paul
Last Name: Bordeaux
City: Massena
State: New York
Zip/Postal Code: 13662
Country: US
Focus: Build
Status: Professional
Serge,
Ditto on not using glue and sawdust. It will end up much darker than the rest of the top! steam and sand is the way to go!
Good luck!

_________________
Paul Bordeaux
http://www.bordeauxinlay.com


Top
 Profile  
 
 Post subject:
PostPosted: Wed Apr 05, 2006 12:21 am 
Offline
Brazilian Rosewood
Brazilian Rosewood

Joined: Sun Dec 25, 2005 6:32 am
Posts: 7774
Location: Canada
Thanks Al and Paul, sure will follow the pros advice! i appreciate it thanks! Update with pics to come!


Top
 Profile  
 
 Post subject:
PostPosted: Wed Apr 05, 2006 4:12 am 
Offline
Brazilian Rosewood
Brazilian Rosewood

Joined: Sun Dec 25, 2005 6:32 am
Posts: 7774
Location: Canada
Thanks for the suggestion Hesh, i'll try the steam first and if it doesn't work, i'll see what i can come up with, your idea is pretty interesting, i have a few ones too for inlaying that i'll put on the back burner in the meantime!

Thanks for the great support guys!


Top
 Profile  
 
 Post subject:
PostPosted: Wed Apr 05, 2006 4:28 am 
Offline
Koa
Koa

Joined: Thu Nov 10, 2005 12:43 pm
Posts: 1031
Location: United States
Don't call me a pro, I've only been doing this about 4-5 years I'm working on #7 right now. I've done a lot of electrical and mechanical design work for over 30 years and many times I draw from those experiences. I also learn well from my mistakes.

Al


Top
 Profile  
 
 Post subject:
PostPosted: Wed Apr 05, 2006 4:33 am 
Offline
Contributing Member
Contributing Member
User avatar

Joined: Mon Jan 03, 2005 7:40 am
Posts: 2694
Location: United States
First name: John
Last Name: How
City: Auburn
State: Ca
Country: USA
Well Serge you got some good advice already and I'm with the steamers (Actually damp paper towel & Soldering iron) so I won't add more than this, Show us the pics after you fix it.

_________________
Tickle your guitar daily, and it'll tickle you back.


Top
 Profile  
 
 Post subject:
PostPosted: Wed Apr 05, 2006 4:49 am 
Offline
Old Growth Brazilian

Joined: Tue Dec 28, 2004 1:56 am
Posts: 10707
Location: United States
Inlaying in spruce is a sticky wickit the lighter the wood the more persice the inlay must fit into the chanel.

I would first steam the dent as much ass possible. then sand to .120-.115. the odds are that the dent will be gone.

By the way Redwood tops are about the thickest tops I build and I never go over .130 on them. All spruce tops I build are in the .115-.125 range depending on stiffness.MichaelP38812.5767592593


Top
 Profile  
 
 Post subject:
PostPosted: Wed Apr 05, 2006 8:16 am 
Offline
Brazilian Rosewood
Brazilian Rosewood

Joined: Sun Dec 25, 2005 6:32 am
Posts: 7774
Location: Canada
Thanks Al but from what i hear, your advice sounds good!

Thanks John, sure will post pics of the steam job!

Thanks also Michael, it does now feel like i'm gonna be able to fix this and sand it down to at least .125, if i don't get too nervous about it, it's still my first time sanding plates on a drum sander ya know and a home made one on top of that so i'll try to go slow, very very very slow for the rest of the sanding!

Thanks to all!


Top
 Profile  
 
 Post subject:
PostPosted: Wed Apr 05, 2006 1:20 pm 
Offline
Cocobolo
Cocobolo

Joined: Tue Jan 03, 2006 4:17 am
Posts: 338
Location: United States
Serge, of course I agree with everyones steam method and/or thinning the top, but if neither do the trick why not inlay a couple leaves there. I forget the term, maybe caligraphy, but a few different woods to give the appearence of the leaf veins would look quite nice. Of course you could use the body as the main color. Just a thought that I hope you don't have to consider.
Mike


Top
 Profile  
 
 Post subject:
PostPosted: Wed Apr 05, 2006 1:32 pm 
Offline
Koa
Koa
User avatar

Joined: Tue Mar 14, 2006 4:08 pm
Posts: 1018
Location: Denver, Colorado
[QUOTE=Serge Poirier] do you think it would be a good idea to thin the outer edges only?[/QUOTE]

Serge, I think that's a fairly common thing to do (though I'm just a rookie). I think Robbie does it.

Mike

_________________
Mike

"The Dude abides. I don't know about you but I take comfort in that. It's good knowin' he's out there. The Dude. Takin' 'er easy for all us sinners. Shoosh." The Stranger


Top
 Profile  
 
 Post subject:
PostPosted: Wed Apr 05, 2006 3:18 pm 
Offline
Brazilian Rosewood
Brazilian Rosewood

Joined: Sun Dec 25, 2005 6:32 am
Posts: 7774
Location: Canada
Thanks for all the suggestions of help guys, i did steam it tonight and the wood fibers raised up slightly and i'm really hopeful to be able to sand it all down ok, but another problem occured, the HHG glue joint was weakened because of the steam and heat, the dent having occured near the center line .

So my new $64 000 question is: is it possible to just wick a tiny bit of HHG in the little crack near the dent that resulted because of the steam? Not all the glue is gone, just the superficial line.

Here are some pics


Inlaying this part is not completely discarded but will try to sand it down first, Thanks for looking!


Top
 Profile  
 
 Post subject:
PostPosted: Wed Apr 05, 2006 4:22 pm 
Offline
Contributing Member
Contributing Member
User avatar

Joined: Tue Jan 04, 2005 10:03 am
Posts: 6680
Location: Abbotsford, BC Canada
Ouch. Serge, you should have read my first post more clearly there. You just want to use the tip of the iron, not the entire iron like you show here


This is what you want


Take a look at Frank Fords steam out tutorial, I should have sent you here first, sorry.

As you read the tutorial, you will notice that Frank appied that little wet rag about (in his words) 100 times, rewetting and just touching the iron for a second or two, than checking the dent. So, 1/2 hour is what it took him to pull that dent up.

About the now large gap you have, you will have to get a very thin blade in there to try and clean up the glue and re-join that area with HHG and tape should work to pull it back together, maybe try heating the area up and just try and work the glue into the seam as much as possible and than close it up with the tape.

Rod True38813.0632986111

_________________
My Facebook Guitar Page

"There's really no wrong way, as long as the results are what's desired." Charles Fox

"We have to constantly remind ourselves what we're doing....No Luthier is putting a man on the moon!" Harry Fleishman

"Generosity is always different in the eye of the person who didn't receive anything, but who wanted some." Waddy Thomson


Top
 Profile  
 
 Post subject:
PostPosted: Wed Apr 05, 2006 5:24 pm 
Offline
Cocobolo
Cocobolo

Joined: Tue Jan 03, 2006 4:17 am
Posts: 338
Location: United States
Serge, is it the lighting or is that seam opened up quite a bit.. I could not see much of the center joint in the before photos, but in the after shots it looks bad. Does it close if you apply pressure. if so you may be able to wick in some thinned hhg and clamp it. But you really need to be able to clamp it shut. HHG isn't for gap fillin.
Mike


Top
 Profile  
 
 Post subject:
PostPosted: Wed Apr 05, 2006 6:48 pm 
Offline
Brazilian Rosewood
Brazilian Rosewood

Joined: Wed Jan 05, 2005 6:25 pm
Posts: 2749
Location: Netherlands
Localized steam, soldering iron (or tip of houshold iron, though I reserve that for my electrics, as a rule) and a small bit of wet kitchen paper. I've steamed out dents on, well, pretty much every guitar I've ever built. That's one of the risks of taking an average of a year per guitar (in short bursts of activity).


Top
 Profile  
 
 Post subject:
PostPosted: Wed Apr 05, 2006 10:04 pm 
Offline
Brazilian Rosewood
Brazilian Rosewood

Joined: Sun Dec 25, 2005 6:32 am
Posts: 7774
Location: Canada
Rod, no need to apologize bud, as i said in my first post, s**t happens, i did this between calls last night while on duty so i'm kind of guilty for being a fool who rushes in.

As Mattia said, the risks are there when you can just get to your shop a few hours a week. Somehow though, i know i can still fix this, so don't worry!

Mike, the glue joint is still holding, it's only the superficial bond that melted so i think that a bit of fill up and tape should do it, if it works the way i think it will, i should be able to sand it all down during the week end, i'll let ya all know how it goes.


Top
 Profile  
 
 Post subject:
PostPosted: Thu Apr 06, 2006 3:02 am 
Offline
Brazilian Rosewood
Brazilian Rosewood
User avatar

Joined: Thu Oct 06, 2005 1:05 pm
Posts: 3350
Location: Bakersville, NC
Focus: Build
Status: Professional
Serge, remember to thin out that top a little more...
.160 is a little thick for a top 
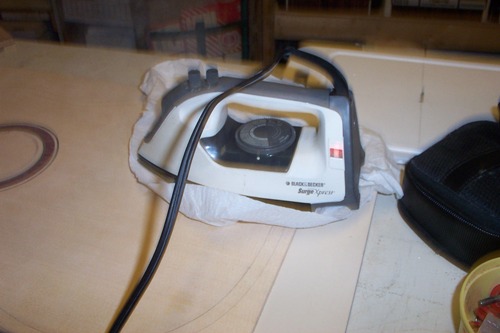
besides, when you thin it out the dent may be gone!~

_________________
Peter M.
Cornerstone Guitars
http://www.cornerstoneukes.com


Top
 Profile  
 
Display posts from previous:  Sort by  
Post new topic Reply to topic  [ 44 posts ]  Go to page 1, 2  Next

All times are UTC - 5 hours


Who is online

Users browsing this forum: No registered users and 14 guests


You cannot post new topics in this forum
You cannot reply to topics in this forum
You cannot edit your posts in this forum
You cannot delete your posts in this forum
You cannot post attachments in this forum

Jump to:  
Powered by phpBB® Forum Software © phpBB Group
phpBB customization services by 2by2host.com